Paint and Cover Your Airplane
There are several ways to paint and cover your RC airplane. I will discuss some of the various ways and either tell you how to do it or refer you to a website that has great information on that type of finish.
Why should you cover your RC airplane? For any "glow" powered aircraft, the fuel that a glow engine uses is typically 60% methanol, 30% lubricant and 10% nitromethane. If you don't cover a balsa wood aircraft, the wood will soak up the oil in the fuel and will become heavy and soften glue joints. It is also hard to clean the airframe if you have all that oil and the dirt it attracts. The main reason we want to finish our aircraft is to make it look good or to make it look like its full scale counterpart.
There are also several ways, with which i am familar, to cover and finish your wings. I'll discuss the one I'm familiar with.
1. Dope and Silk - Most of the old, small free flight / control line models that were sold back in the 50's and 60's usually came with a cheap substitute for silk called Silkspan. It is used the same way as silk. I will refer to silk but silkspan is worked the same way.
There are a three types of wing construction currently used in the construction of radio controlled aircraft:
A. Balsa built up construction
With this type of construction, there are open spaces between the wing ribs and between wing sheeting. This type of wing has to be covered with some type of material that can shrink and fight tightly over the wing structure. Some built up wings are completely sheeted in balsa. The wing can then be covered with an iron on covering or can be painted.
B. Foam with no type of covering
Usually the foam is injectijon molded and has a smooth finish. Some wings are either "hot wired" or rough cut.
C. Foam wing core
The foam wing core is generally cut with a "hot wire" that gives a strong, lightweight structure that has to be covered. Usually, a thin balsa sheet or very thin plywood is used to cover the wing. Then the wood sheeting is covered or the grain is filled and then painted.
2. Iron on materials - They have been around since I started aeromodeling back in the early 1970's and they transformed how modelers finish their airplanes!
I know of only two types of iron on covering. They are:
A. Plastic type iron on material
The oldest brand of iron on material I can think of is Top Flite's Monokote. As far as I know, it was the first of it's kind. Ultracote is another brand. There are several other brands available and most of them I've used work well.
B. Iron on clothe
Coverite is the only brand of iron on clothe I can think of. One of my first RC kits was a Midwest Esquire or TriSquire and I covered it with Coverite. That was way back in the mid 70's. I love this stuff but without painting it, you can't get a mirror finish like you can with plastics. The fabric can't be built for a scale airplane where the full size plane used fabric.
3. Fiberglass clothe and epoxy resin and then painted. I prefer this type of finish on my balsa fuselages. It takes some extra work but the finish is strong and beautiful.
On solid surfaces, this is my preference for finish. I won't work on open or built up surfaces unless they are covered first. If done right, this can give one of the most beautiful finishes that can be attained for your model. ***See my note about paints and fuel!
***A Note About Paint and Fuel***
You may have seen the term "fuel proof". Many paints are not fuel proof and the paint will be adversely affected by coming into contact with model airplane glow fuel. I have always seen the finger pointed at the nitro mehane in our fuel. I believed that for years and it may certainly be true. I found out that it is not the only culprit. I have used FAI fuel (model airplane fuel with no nitromethane) for a few years in my glow airplanes. Even without nitromethane, I have seen paint dissolve. Even Rustoleum brand spray paint can't stand up against glow fuel, with or without nitromethane. Rustoleum is recommended by many modelers and many of them swear it is fuel proof. It may last longer than a cheap paint like Krylon but it still wears out to repeated contact with glow fuel.
The best paint I have ever used and it is absolutely, 100% fuel proof and that is a two part epoxy paint. I first used K&B Superpoxy on a Sig Kougar in the mid-70's. To get the best finish, the epoxy paint needs to be sprayed and it requires that you have some kind of air compressor and spray equipment. Klass Kote is the only supplier for this type of paint that I am currently aware of.
Glow fuel can cause problems with iron on materials too unless the seams are sealed extemely well. Top Flite makes a solvent that can be used on Monokote to seal the seams. The solvent works very well and a small bottle will last quite a long time. I am not sure it works on other types of iron on materials.
With electric powered model aircraft becoming ever popular, paint selection will become much easier. The larger model aircraft which use gasoline powered engines can be painted with many types of paint that glow fuel will destroy.
When painting foam wings, be sure to use a paint that will not attack and dissolve the foam. You may be wise to paint samples to see if the paint is compatible before trying it on your aircraft. I used a paint once on the wing of an Ace Pacer way back when. The paint I bought was advertised as being for use with foam wings. The paint reacted with the foam and left divits in the wing. And, once you find a paint that won't attack your foam, you may also have to make sure the paint is fuel proof if using glow fuel.
Some paints that are fuel proof are:
Klass Kote - Two part epoxy paint. Excellent paint, maybe the best for RC aircraft paint if you have the capability to spray.
Automotive Lacquer - This also needs to be sprayed for best results as with any kind of paint.
Butyrate Dope
Polyurethane - I built my flight box several years ago and painted it with a clear, satin finish polyurethane. It has not been affected by glow fuel and has stood up well to all the abuse I've given it over the years. A water based polyurethane could be used as a clear coat over latex or other paints.
Latex paint - On my second Great Planes Super Skybolt that I built from a kit, I originally used Monokote to cover the wings and the fuselage. I didn't fly the aiplane much and the Monokote looked king of ratty so I stripped it off and fiberglassed the fuselage. I used a latex primer over the fiberglass but I found out that I could not wet sand the latex. It would ball up and just not work like the other primers I had used. (See section on fiberglassing).
Coverite's 21st Century paint - Coverite says this paint is fuelproof up to 15% nitromethane.
Top Flite's LusterKote - Their product label says it is fuelproof. I am going to find out shortly. And one great thing about this paint is that it is supposed to match Monokote's colors. I get really frustrated when I can't match my paint to the Monokote I use.
Fuselages are covered in the same manner as wings. Until just the last few years, most balsa fuselages were of box type construction and the top, sides and bottom were solid. With the 3D craze, it seems more and more fuselages have lightening holes cut in them or they may be of sick contruction. If there are holes in the top, sides and/or bottom of the fueslage, you will have to use the same type covering procedure that would be needed for the same type of wing.
Finishing Procedures and How To
Dope and Silk
Before iron on materials, this was the way modelers covered their airframes. A piece of silk is cut slightly larger than the structrue it is going to cover. Do each wing panel , top right, top left, bottom right, bottom left, seperately. Some modelers paint their wing with clear dope and let it dry. Then they wet the piece of silk and wring out any excess water leaving the silk slightly damp. Then they lay the silk in place and brush a thinner like Acetone through the silk, pullint the silk tight at each corner. Because the dope is already painted on the airframe, the thinner causes the dope to get sticky enough to hold the silk in place. I always just painted the dope through the silk to glue it to the airframe without pre-doping the structure first. I think the pre-doping idea is best and is described HERE .
Once the silk is glued in place, take a household iron and on a medium heat, iron out any wrinkles. The idea is to make the silk fit tightly like a drum. Then, follow the manufacturers directions to paint the silk with the dope to make the silk airtight. Back in the 40's and 50's when most light aircraft were covered with clothe, once the clothe was doped, the finisher would give it a "kiss test". To do a kiss test, pucker your lips and "kiss" the painted silk and see if you can pull it up just the pressure of your lips sucking.
Silk is expensive. I just priced a square yard of K&S Silk through Tower Hobbies and it costs $59.99 (April 9, 2010). Silkspan is a little more than half of that and available in three thicknesses. Dave Brown's Skyloft is the most reasonably priced of the three.
Here is an important note about dope. There are two kinds of dope; nitrate and butyrate. Butyrate dope is fuel proof and gives a lacquer type finish. Nitrate dope is not fuel proof and would work well on electric powered and gasoline powered aircraft.
Sig Manufacturing manufactures dope. Here is what they say about nitrate dope on their website:
Nitrate Clear Dope
Nitrate clear dope is primarily intended to prepare model surfaces for a painted finish. Nitrate acts as a sealer for bare wood and uncoated covering materials, and its application establishes a well bonded base for most commonly used model paints. Fast drying. High gloss. Often preferred over butyrate dope in many modeling applications because of its unique chemical characteristics.
Check these advantages:
- Better adhesion to most structures and coverings than butyrate dope
- Controlled shrinkage - Nitrate dope shrinks only a moderate amount compared to butyrate
- Helps eliminate warps and dope "blisters" at sharp 90O corners
- Higher solid content than butyrate dope for faster filling
- Compatible with most model paints - Nitrate dope is often used to seal the bare model surfaces and provides a good base for finishing with butyrate dope, enamel, or epoxy paints
- Ideal for use alone on light free-flight rubber models where fuel proofing is not necessary.
|
Other manufacturers of dope are:
Midwest Aerogloss
Randolf Products
Brodak
I recently read in an RC Universe forum that Brodak dope is manufactured by Randolph. Randolph is available through Aircraft Spruce and Specialty or Wicks Aircraft and Supply, both of which are suppliers for full scale homebuilt aircraft. A lot of information can be picked up from these forums. I would highly recommend them to help you learn any new kind of building or finishing procedure for your RC plane.
As with any kind of paint, spraying is the way to go if you have the equpment. When I was younger, I brushed dope onto my airplanes and as long as you keep a wet coat going down, it won't show paint lines too badly. Also, as with any other kind of paint, you must first fill the grain of the balsa you are going to paint. I recommend covering the exposed balsa with silk, Silkspan or Skyloft before putting on a sanding sealer. It will take fewer coats to fill the weave of the covering material than it will to fill the grain of the balsa. Some people mix sanding sealer with talcum powder to make and easily sandable finish. The more time you spend preparing the base, the better the finish coat will look so take your time and spend a lot of time sanding!
Iron on Covering
I have used a lot of Monokote in my life. It is pretty easy to use and gives a mirror like finish. Before covering any surface with any iron material, make sure the wood is sanded and dents are filled. The smoother the wood, the better your iron on covering finish will look. All iron on coverings go on in the same fashion. For simpliicity, I will refer to all plastic iron on coverings as Monokote.
About the only tip I can give concerns putting Monokote over Monokote. You can use an ordinary household iron but the Monokote will leave colors on the iron and your wife won't be happy. Buy yourself an iron made specifically for use with iron on coverings. When ironing Monokote over Monokote, use the lowest settings on your iron or you will have horrible bubbles in the top layer and there is no way to get them out. You can also use Monokote Trim Solvent. I like to lay the Monokote trim in place and then use a Q-Tip to liberally apply the solvent. The solvent will not affect the finish on the covering. It only affects the adhesive on the back of the covering. I have only tried the Monokote Trim Solvent on Monokote and not any other kind of plastic iron on coverings.
Click Here to see Top Flite's covering tips for using Monokote. Use newspaper to back the Monokote when you cut trim sheets. Taking your time is the key to getting a good finish with Monokote.
Plastic iron on covering can be painted if you use very fine steel wool to dull the finish before painting.
Fabric Iron on Covering
I am only aware of one company that makes fabric iron on covering and that is Coverite. Their fabric is excellent and my preference as far as ease of use, strenght to weight and durability. Click Here to see frequently asked questions about Coverite. Coverite comes in many colors and styles and can easily be painted. For scale applications where the original, full size airplane used fabric covering, Coverite is an excellent choice!
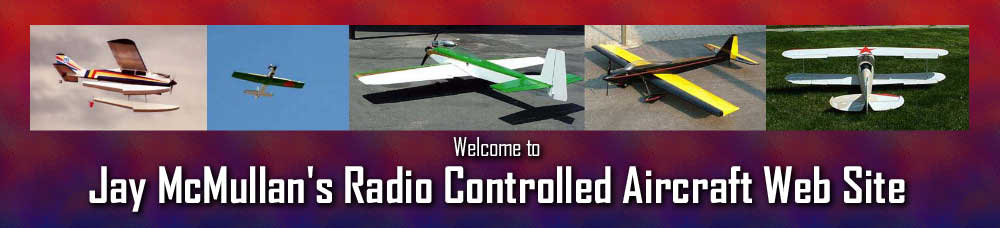
Fiberglass, Primer and Paint
My personal preference for finishing a balsa fuselage but it is a lot of work. Once the fuselage is built, fill any dents with lightweight filler. I bought some at Home Depot. The name is "Fast and Final, Lightweight Spackling". Do NOT use spackling paste. It is very heavy. The lightweight filler is very very light and when it is dry, it adheres well and sands very easily. I used to use phenolic "Micro Balloons". Top Flite, the manufacturer of Monokote makes microballoons which can be found or ordered through your local hobby shop. When mixed with epoxy, microballoons make a good and strong filler but it is extremely hard to sand when the epoxy is cured. I don't recommend microballoons unless you need a very strong filler.
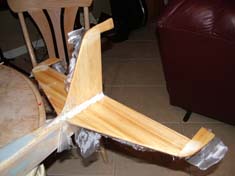
When your fuselage is prepared, remove any hatches, engine, etc., I like to use 30 minute or 45 minute epoxy. I also use denatured alchohol that I purchased at Home Depot to thin the epoxy. Thinning the epoxy slightly will cause it take longer to cure. Use a brush, I like to buy hobby brushes in bulk. The last ones I bought at Harbor Freight. They are probably available at most hobby shops. Use fiberglass finishing clothe that weighs .56 ounces per square yard. Sig Manufacturing makes some and it is available at your hobby shop.
I like to begin by covering one side of the fuselage. First I cut out a piece of fiberglass clothe slightly bigger than the side of the fuselage. The clothe is very sheer and drapes easily around curves. Mix the epoxy and slightly thin it. Don't get too crazy here but thin it enough that it will flow with your brush. Remember that the fiberglass clothe is being used to cover the grain of the balsa. It will add strength but that is not the main purpose. Many people think that the more epoxy you use, the stronger the finished structure will be. Epoxy is heavy and you want to use as little as possible, making sure it has completely saturated the clothe and adheres the clothe to the balsa. Brush the epoxy out, making sure to not leave any wrinkles or air bubbles. Remember that you are going to overlap the top covering and the bottom covering over the sides after they are covered. Only brush your epoxy about a quarter inch onto the top and bottom of the fuselage along the length of the structure. When the epoxy has set but is still rubbery, take a sharp razor and trim the fiberglass clothe that was not glued down. After the epoxy has cured further, sand the edges of the clothe smooth. The clothe that did not get resin will easily sand away.
I do the tail surface a little differently. I fiberglass both sides of the bottom of the horizontal stabilizer first. After that is set and I sand off dry clothe, I fiberglass both sides of the top and before everything is set, I fiberglass one side of the vertical stabilizer. When that side is finished and the dry clothe sanded off, I fiberglass the other side of the vertical stabilizer.
I have not tried this method but it may be a good one. Some people take a roll of toilet paper, after applying the epoxy and clothe and they roll the toilet paper along the wet structure, soaking up any extra epoxy. If you are set up for it, you can vacuum back the fuselage. The purpose of both procedures is to get rid of excess epoxy that only adds weight and not strength. Some people say that vacuum bagging actually makes a structure stronger. I have never tried either of these techniques.
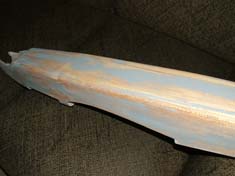
This is one of the reasons fiberglassing takes so long; by working on one surface at a time. Once the fuselage is completely fiberglassed and reasonably set, it still may be just a little sticky, using wet or dry sandpaper, approximately 220 to 300 grit wet sand the fuselage. I like to use an orbital sander being careful not to submerge the sander in water when I am wetting the paper. Frequently wetting the sandpaper will keep the grit from clogging. Try to get the high spots of epoxy off of the fuselage. You don't have to do a perfect job just yet. Be careful not to sand through the fiberglass clothe. If you do happen to get a little too agressive, put a patch of fiberglass clothe, slightly bigger than the damaged area and brush thinned epoxy onto it, gluing it to the structure. Then, when dry, sand smooth. Once the entire fuselage is sanded, wipe it down and alow to dry. Once dry, use a fast drying auto primer. I use Rustoleum brand avalible from Home Depot and Lowes. Spray two or three coats over the entire fuselage, allowing the primer to dry between coats. Don't worry about weight right now.
 |
Primer is used to fill low spots on the fuselage. After the primer is dry, wet sand the fuselage. You want to sand almost all of the primer off. Only the low spots will be left with primer. Wipe the fuselage down and let dry. Repeat the process two more times and by then you can decide if your fuselage is ready for paint. I like to put about two coats of paint with a very light saning in between. Then I apply my decals and put a clear coat over the entire fuselage.
I am just about finished building the prototype of my Extreme Kaos. I am going to use Top Flite's LusterKote and then use Coverite's 21st Century clear coat. I am hoping to get very good results. To get a mirror finish, use a high gloss clear coat and then buff the finish out.
Decals
Testors makes small sheets of water based decals that can be printed on by a laser printer. I have used this material to make custom made decals for my models. it is not fuel proof so I always use a clear coat over the decal. For my Extreme Kaos, I want a much larger decal to cover a large area of the right wing. I went to a local Staples store and asked if they had any kind of decal material that large. The only thing they had were clear, 8 1/2 x 11 inch labels. I designed the decals on my personal computer and my wife used her laser printer to print the decals onto the labels. I would be pretty certain that an ink jet printer would not give a fuel proof finis
h. A laser jet printer could but I will clear coat the decals to be sure. I will report back later on the results. |