I often hear people asking how to take photographs with a digital camera. Through this short Photograpy Course, I will touch on the basics of photography and the three things that make a successful photograph. Unfortunately, It will not teach you everything there is to know about photography or how to use your camera. It will build a solid foundation for your photogrphy.
I bought my first camera when I was eighteen years old in 1978. This was long before digital cameras were invented. I eventually bought my first, really good, 35mm camera. I learned how to process film and I loved being in the darkroom. Luckily, with digital cameras, we can do almost everything a film camera can do and do it better in many cases.
In this couse, we are going to deal specifically with digital cameras.There are some photography purists out there who are either staying with film cameras or going back to them. For the most part though, people are using digital cameras.
With each short lesson, I will give you some assignments. They are simple exercises that will start building a foundation in photography and help you become a better photograper. The great thing with using a digital camera is that it won't cost anything except for your time.The days of having to buy film and then pay for processing are over!
When I first got into photography, I studied everything I could about the subject, especially books by Ansel Adams. We did not have the Internet at that time. As I began to build my hobby into a vocation, I joined the Texas Panhandle Professional Photographers Association. Several of the photographers in that group took me under their wings and taught me how to shoot studio portraits. I have to mention Master Photographer Fred Hughes from Dumas, Texas. He taught me so much. Keith Hart, who had a studio in Borger, Texas, was a master at making money with a camera. He and I got to be dear friends. I could name many more. Also, in 1983, I was awarded a scholarship to the Texas School of Professional Photography at Sam Houston State University in Huntsville, Texas. I have done about every kind of photography you can imagine and I hope I can pass some of my knowledge and wisdom along to you as so many have done for me. Sometimes, I forget what it was like to be just starting out in photography, so if you have questions, please email me. jay(remove this)@jaymc.com
THE THREE BASIC ELEMENTS TO A SUCCESSFUL PHOTOGRAPH - THE PHOTO TRIANGLE
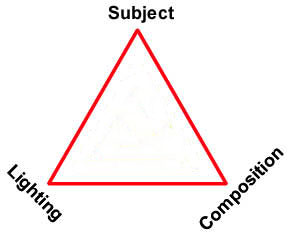
The Photo Triangle consists of three equally important elements
In our first lesson, let's talk about SUBJECT. But, first, let's talk about your digital camera.
All digital cameras have a viewfinder or a viewing screen. Let's face it, if you had no way to look through the camera to see what is seeing, each of your photographs would be a guess. There were cameras like this and still are. Most of them are old film cameras. We won't go into those now.
With all of the different camera makes and models, There is no way to discus, in detail, every camera. As you go through this course, you may need to refer back to your camera's manual for technical Images. If you have lost your manual, most of them can be downloaded off the Internet.
Most digital cameras will have an on/off switch and a settings knob, generally with a P, S, A or M showing as the modes for your camera. For right now, put your camera on P and leave it there.
YOU DO NOT NEED AN EXPENSIVE CAMERA TO MAKE GREAT PHOTOGRAPHS
Each digital camera has a "sensor" that collects the light that falls on it and then it turns that image into a digital code that can be viewed as a photograph on the camera and on a computer. You may hear of a camera being a "cropped frame sensor," a "micro four thirds" sensor or "full frame" sensor camera. Check your camer's manual to see what your camera is. Full frame sensor cameras are more expensive because they use a larger sensor which is about equal to that of a 35mm film camera. The lenses on a full frame sensor camera will approximate the same field of view as a 35mm camera would with that same lens. The cropped and micro four thirds sensor cameras have a sensor that is smaller and if you were able to use the same lens on one of these cameras as you did with your full frame sensor camera, you would see a maked difference in the photograph. For example, a 50mm lens on a 35mm film camera will approximte just about what your eye sees. We see a 47 degree image so the 50mm lens is considered a standard lens for the 35mm film camera and the digital camera with a full frame sensor. If you put that 50mm camera on a cropped frame or micro four thirds camera, it will have an longer focal length. My Nikon D5200 will magnify a lens focal length by 1.5. In this case, the 50mm lens will be like a 75mm lens on the full frame camera. This can be an advantage if you shoot a lot of Images with telephoto lenses. A 300mm telephoto lens will be more like a 450mm lens on my Nikon D5200. Where this works against us is when we shoot with wide angle lenses. A 28mm wide angle lens would be like a 42mm lens. Check with your camera manual to see information on its sensor.
WHAT IS ISO?
Every digital camera has a lens, a viewfinder and a sensor. The sensor is what actually records the photograph. The International Standards Organization sets the standard for how much light is needed to make an image on a sensor. The ISO tests the sensors to see how much light is needed to make an image appear. With film, each piece of film was tested and given the ISO rating. I always like to shoot 100 ISO film but if I was going to be shooting in a darker situation without a flash, I would use a higher ISO rated film. The higher the ISO, the less light is needed to record an image on the sensor in your digital camera. The payback for using higher speed film was that the resulting photo would have more grain. The same holds true for digital cameras. The higher ISO you use, the more the image will begin to "fall apart." Being able to change the ISO on a digital camera is a true luxury that only old film photographers can fully appreciate. When shooting in daylight, I like to set the ISO on my camera to the lowest it will go. In my case, that is 64 ISO. Yours might be the same or it could be 100 or even 200ISO. On a bright day outside, use the lowest ISO rating your camera has. It it is overcast outside, you may want to use ISO 400 or 800. Even higher ISO settings may be required at other times.
WHAT IS FOCAL LENGTH?
Every lens has a focal length. The human eye sees approximately a 47 degree view from left to right. In 35mm film cameras, the 50mm lens was considered "standard" which would be the closest to what a human sees. The 50mm lens was called a standard lens for a 35mm camera. It is actually the measurement from the front of the lens to the film plane on the camera but we won't get into the science of it here.. Back around the turn of the 20th century, when photographers used view cameras (these were the cameras that looked like accordians) lenses were measured in inches instead of millimeters. The standard lens for my 4"x5" view camera is a 150mm or 6 inch lens. The longer the focal length of a lens, the more of a telephoto lens it is. A 100mm lens will zoom in double what the 50mm lens will. A smaller focal length, the wider the angle of view will be. A 25mm lens will shoot a photo that is twice as wide as a 50mm lens, etc. The sensor size of your camera will determine if a lens is a wide angle, normal or telephoto lens. Back in the day, only fixed focal length lenses were made. Eventually, lens manufacturers learned how to make variable focal length lenses that we now call ZOOM lenses. Chances are you are probably using a zoom lens on your camera right now.
WHY DOES MY CAMERA HAVE THE P, S, A and M SETTINGS?
When I first started into photography in 1979, digital cameras had not been invented, neither had home computers.Everything was manual in our cameras then. Focusing, setting the shutter speed and aperture were something we had to learn how to do. If we were lucky, our camera would have a built in light meter that would help us make those settings. If not, we had to carry a hand held light meter along with the camera to measure the light so we would know how to set the camera. To help you understand this, we will start with the M setting.
The M stands for the Manual Mode. In this mode, the photogrpaher has to set the ISO, the aperture and the shutterspeed. This mode will take you back to where I was when I first started into photography. For now, we are not going to go into shooting in Manual Mode, you can learn to do that later on.. Every time you take a photo, the amount of light that is allowed to come thorugh the lens to the sensor is adjusted by the APERTURE. The amount of time that light hits the sensor is determined by the ISO setting on your camera and the SHUTTER SPEED. The aperture and shutter speed are either set by you or by your camera. The mode that is set on your camera will determine how this is done.
The A stands for Aperture Priority Mode. In this mode, after setting the ISO on your camera, you will determine what aperture size you want to use for a photograph. The first automatic camera I saw had Aperture Priority Mode. It was a Canon AE-1. The aperture is the small opening in the lens that allows light to go through to hit the sensor. Modern lenses have small leaves that collapse or open right at the time of exposure to give the proper aperture size. The "speed" of a lens is determined by its aperture size. For example, a lens with a maximum aperture of f:1.2, f:1.4 and even f:1.8 would be considered a "fast" lens. A maximum aperture of f:5.6 would be considered a slow lens. Aperture is always refered to as a number that begins with an "f". Most lenses will have an aperture range. This is how much variation there is in the amount of light that a lens will allow to hit the camera's sensor. For example, you may have a 55mm lens with an aperture range of f:2..8 to f:16.
The larger the aperture opening, the smaller the number is. This can be kind of confusing at first. Let's say we are using a 50mm f:1.2 - f:16 lens. That is an extremely fast lens. Let's say you are shooting in a dark area, if you wanted to allow as much light in as possible with that lens, set it to f:1.2. If you want to have a longer depth fo field, set the minimum aperture of f:16. Using a smaller aperture of f:16 will require a longer shutter speed or higher ISO to get a properly exposed image. The larger aperture (f:1.2) will take a faster shutter speed and/or lower ISO. This might be confusing to you right now and is something you can study more at a different time.
The S stands for Shutter Preferred Mode or Shutter Priority. Using shutter priority allows you to capture high speed action. It can be used in an opposite way to take "time expsures" of subjects that very dark. Shutter speeds will typically run from 1 second to 1/2000th of a second. Some cameras are different. The first time I ever took photos at a drag race, I had decided that I had better use the fastest shutter speed my camera had which was 1/1000th of a second. I took some photos of a top fuel eliminator drag racer burning out. When I got my photos back, I would count the lug nuts on the back wheel and it looked like the tires were not moving! I found out later that it was better to use a shutter speed of 1/250th of a second or 1/250th of a second and then I would "pan" or move with the car when I photographed it. This kept the car sharp in the photo but you could see the wheels were blurred because of the spinning motion and the background would be out of focus. It gave a sense of motion but left the car sharp in the photo.
The P stands for Priority Mode. As you point your camera toward a scene and press the shutter button, the camera will determine, almost instantly, what is the best shutter speed and aperture setting will be best. 95% of all photographs will turn out well in Priority mode. Keep your camera set there for most of this course.
HOW DO ISO, APERTURE AND SHUTTER SPEED WORK TOGETHER?
As we go on through this lesson we will see the three elements of a successful photograph. All of these have to work together. They are either set by you, partially set by you, partially set by the camera or completely set by the camera.
In photography, light is measured in "STEPS." Camera manufacturers test the sensors in cameras and determine how much light needs to hit the sensor in that camera to make a successful photograph. There is a lot of science to all of this that most of you won't be interested in. But one of the things you do need to know is how shutter speed and aperture work together.
Let's say your camera is set at ISO 400. That ISO rating will need a certain combination of aperture and shutter speed to make a successful photograph. Let's say, you look through your camera and the built in light meter shows that it is going to take the photograph at 1/125th of a second at f:8. If you camera lens' focal length is f:2.8 to f:16, chainging the aperture from f:8 to f:16, you have changed your light by one step. This will make you have to change your shutter speed by one step.. Since f:16 lets in only half the light that f:8 does, you will have to use the nest lower shutter speed which will be around 1/60th of a second. This is something you can learn more about later. For now, let's get you to taking photos!
CLICK HERE to Go to Lesson One